Some time ago I was asked to give my advice for figure drawing, so I thought I’d share some of my thoughts. Hopefully, I’ll be able to provide something useful. To me, a drawing is much more different than a sketch. A sketch is a simple quick visual representation lasting only a few minutes. Its purpose is to work on gesture and recording information quickly, and for the most part, not an accurate depiction of the subject. That’s what I think a drawing should do. A detailed drawing will take anywhere from 3-12 hours depending on how detailed the drawing is. And will contain as much accurate detailed information as possible.
I will try to describe my process as best as possible while I show you images of one of my current drawings.
The block-In
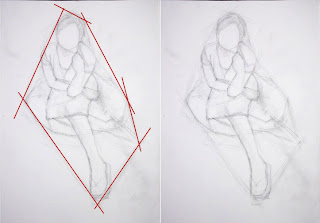 Lately, I’ve been using the Charles Bargue method of blocking in the outlining shape of the subject. This helps with overall proportions and gesture. In this image you can see that I’ve begun with a very simple shape outlined in red. I’m trying to create this shape in as few lines as possible. Once the outline is in, I try to then lay in the figure in very simple shapes focusing on how they relate to each other in the big shape I created—paying special attention to proportion. I try to keep the marks light because most of these initial marks will be eventually be adjusted or erased
The ghostly image

Because I’m still refining shapes at this point, I try to keep the drawing very light again focusing on how one thing relates to another. I use imaginary vertical and horizontal lines quite a bit to “check” my drawing. I hold up my pencil in between the subject and my eye to see how things line up. For example, I can see vertically where the nose lines up with the knee or horizontally where the elbow lines up with the hand. This is a good way to see if the big shapes I’ve recorded are correct. The worst thing I can do is fall in love with a single mark or section, and although I know it not correct or in the wrong place, I try to make the rest of the drawing fit because I drew that area so beautifully. That is why it is so important to keep it light and work from big shapes to small, so I don’t get caught up in areas that are so wonderfully drawn but completely wrong that I just can’t erase them.
Establishing light and dark
The next step is to find the darkest dark and the lightest light. If I know these two values then I can more easily determine all the values in between. It’s now where the drawing really starts to come together. Although it’s a 2-dimensional surface, I try to work my hatching across the form like a typographical map to create what appears to be a 3-dimensional object. For example, instead of hatching down the leg, I hatch across it. And since I know everything is right and proportionate, I go ahead and work one area into the next until I have a completed drawing.
 Lately, I’ve been using the Charles Bargue method of blocking in the outlining shape of the subject. This helps with overall proportions and gesture. In this image you can see that I’ve begun with a very simple shape outlined in red. I’m trying to create this shape in as few lines as possible. Once the outline is in, I try to then lay in the figure in very simple shapes focusing on how they relate to each other in the big shape I created—paying special attention to proportion. I try to keep the marks light because most of these initial marks will be eventually be adjusted or erased


No comments:
Post a Comment